Every Knight Shaving Soap Tips & Methods
Are you new to traditional wet shaving? Welcome – traditional wet shaving is making a comeback, and we’re excited that you are part of the movement! There are many techniques for whipping up a perfect lather. We encourage you to experiment and find the method that works best for you. The real trick is to find the right combination of soap and water, and then creating a lather with your shaving brush to achieve your desired consistence. Start by soaking the bristles of your shaving brush with hot water. Work the brush and soap in a circular pattern as well as back-and-forth for several seconds. A lather will form almost immediately. For a thicker, richer lather, continue to work the soap with your brush. Note, you may need to add (or remove) a small amount of water during the process. A lather ranging from very thin to a yogurt consistence can be achieved with a small amount of time and effort.
Should I leave the soap in the in the tin? Some customers leave their soap in the tin, others transfer the entire soap puck to a mug/bowl, and some scrape a small amount off the top of the puck for each individual shave and create their lather in an empty lather bowl. A few even scrape a small amount off the top of the puck, spread it directly on their face, and then create the lather with a wet brush (in essence using their face as the lather bowl).
How do I bond the soap puck to the lather bowl/mug. An easy way to keep the puck from spinning while whipping up your lather is to add a small amount of water in the bottom of the bowl/mug, spin the puck a few turns, and then gently press the puck down to the bowl. Once the water and soap dries, the soap should have a firm enough bond with the bowl for trouble free lathering. Note, the drying process may take a day or so to complete.
Tips for Caring for Your Shaving Brush – Protect Your Investment
Avoid using excessive pressure when creating lather. Excessively hard, downward pressure, with hard circular motions will cause the bristles to twist and breaking off over time.
- After shaving, gently, and thoroughly rinse brush of excess shaving cream with warm water.
- Never pull or twist the badger hair.
- Gently flick your brush to remove excess water.
- Always store your brush in an open air area (preferably upside down on a stand) since mildew and soap scum can deteriorate natural hairs and cause breakage.
- Clean if needed. If your brush becomes affected by mildew or a build-up of soap, soak it in a solution of borax, which can be obtained from a pharmacy.
Taking an extra moments to care for your shaving brush will help keep it looking new after hundreds of shaves.
Ferro Rod Fire Starter Tips
Remove the Ferro Rod’s Black Coating: Your ferro rod comes with a black coating, which prevents oxidation. This black coating has to be removed before you can create a spark. This black veneer is easy to scrape off. Two or three scrapes should expose the shiny metal surface. You don’t have to remove all the black, just a wide enough line so you see the shiny area on the rod where you scrape.
The Best Tinder: Dry, fluffy material works best. Cotton balls, drier lint, char cloth, hemp rope, and natural plant fuzz (e.g. cattail seed, goldenrod fluff, and milkweed) all work great as the fuel to allow the sparks to stick and burn.
Consider Moving The Rod, Not The Scraper: Hold the striker’s edge at about a 45-degree angle to the rod. Pull the rod across the striker towards you instead of pushing the striker towards your tinder. This technique will help you avoid accidentally disturbing your tinder setup with your down stroke.
I Think I’d Prefer the Razor Handle to Curve the Other Way
Note: Perform the below procedure at your own risk.
We recommend that you try it out as is for a few shaves. If you still prefer the handle to curve the other way, then you should be able to easily modify using epoxy glue. The collar is glued and screwed to the antler, so it would be very difficult if not impossible to get 180-degree-turn out of it. However, there is one easy way to invert the head, but please note this will permanently fix the head to the handle making the head unmovable afterwards (most people never remove the razor head anyway, so probably no big deal here).
- Mix up a tiny amount of 5-minute epoxy (we use Loctite Heavy Duty brand).
- Dip the threaded part of the razor head in the epoxy.
- Thread it all the way until it is tight in the collar.
- THEN, back it off 180 degrees (or to your desired position) and let the epoxy set up.
Note: You’ll have 5 minutes before the epoxy cures, but give it more time to fully harden before using — at least a couple of hours or so. For the first 5 minutes, keep a watchful eye on it to make sure it maintains your desired position (parts can slightly slip/drift during this 5 minute window, then harden in an undesirable position, which would defeat the whole purpose of this fix). Have a paper towel and maybe a small cloth on hand for any necessary cleanup. The 5-minute epoxy gives you plenty of time to get everything set and to clean up any excess drips or mess before the epoxy sets.
Caution: You may be tempted to use super/crazy glue, but it would probably set up too fast before you got the head threaded all the way to the desired position.
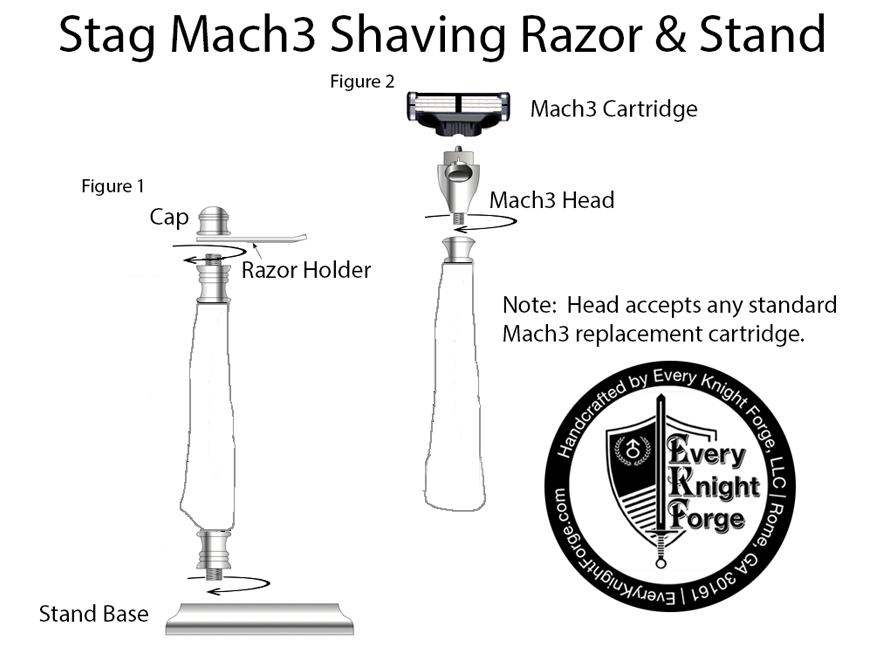
Razor & Stand Assembly